Solar Kiln Build Instructions
- Dec 16, 2016
- 10 min read
I mentioned building a solar Kiln early on in my woodworking career and in 2011 I did an article for Logosol on that project (see below) and later uploaded it to Scribd, (https://www.scribd.com/document/75185056/Solar-Kiln-by-Bill-Stuewe)
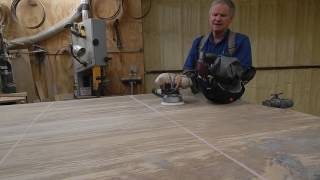
I use this kiln quit a bit . I have dried 8/8 loblolly pine in 10 days from wet log to 7% MC. White oat takes about 4 months to get to 8%. When I have to buy pressure treated lumber, which as you know comes dripping wet and warps all over the place as it dries, I place it in the kiln and weight it down good and in about a week it is nice and lite and dry and much straighter than normal.
Solar Kiln
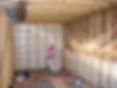
by Bill Stuewe I reviewed close to 50 solar kiln plans on the Internet and settled upon this modification of my own. Its basic dimensions are: 20' long x 8' wide x 7' high from the floor on the south side and 11' 8" high from the floor on the north side. Orientation is facing due south and the roof slope is 30 degrees (which is my latitude). Originally, I had planned to pour a slab but found out that the concrete acts as a heat sink which is not good for drying wood. Concrete can be insulated but the fumes from drying oak can degrade the cement. Then, I was going to pour 5 concrete beams. The beams would have worked just fine, but I came across a free 30 foot piece of railroad track and cut it into five 6' sections to use as beams. I used dry sack-crete under each end to level them. I inset the first and last 1' from each end and set the rest up on 4' 6" centers. When I had all the beams perfectly level I poked holes in the sacks, watered them well, and let them set up. I then put four evenly spaced 4" x 6" x 20' runners down (see Illus. 1) and then put a deck of 3/8" exterior plywood on top of them. Next I put 2" x 4" x 8' floor joists down and put R-13 batt insulation between them. (I found out later that it would have been better to have used a rigid foam type insulation instead of batts. Batts are not good to use because of the high moisture problem associated with drying wood). Once the insulation was down, I put a layer of ¾" plywood decking (see Illus. 2) and painted it with aluminum asphalt roofing paint.


Illus 1
Illus.2
I then framed the building on 16" centers leaving the square part of the East End unframed so I could make it into a door. I covered the outside with corrugated sheet metal that I had on hand.

Illus. 3
llus. 4
Before I put the rafters on, I covered the entire attic floor with flat black 4'x10' flat sheet metal. I set a few rafters in place to get the correct distance for sheet metal coverage on the south edge, placing the tin against the "v" formed by the intersection of the rafter and ceiling joist (Illus. 6). Be sure and cover the ends and north walls with the metal also. The entire attic area must be flat black (Illus. 5). I put the rafters on 24" centers and made them 10 feet long. I ordered five 4'x10' double wall polycarbonate panels for the roof (the roof needs to be double however you do it so as to prevent as much heat loss as possible-Illus. 3).


Illus. 5
Illus. 6
I capped the ends of the rafters top and bottom with 1"x6" cypress (cedar will do). The top soffit hinges so that I can open it when the kiln is not in use and close it when the kiln is in use. (Illus. 7 & 8)


Illus. 7
Illus. 8
The bottom soffit is doubled and two 5" holes were installed with a fly cutter between each rafter. Attach screen wire on the top of the holes of the top board to keep bugs out, The bottom board is fixed in place so that it will slide and regulate the intake of fresh air. (see Illus. 9 & 10)


Illus. 9
Illus. 10
I installed short 2"x4" spacers between the ceiling joists under the edge of the attic sheet metal on the south side of the ceiling. I then ran the electrical wiring for the fans and lights. I put 2 attic fans from the local home center about 5' from each end and right next to the north wall. They fit nicely between the 16" ceiling joist spacing and blow the hot air from the attic collector down into the wood chamber along the north wall. (See fans in Illus. 13 & 15) I then installed the insulation in the north, south, and west wall and the ceiling. Next, I put in a vapor barrier of 6 mil plastic sheeting on the walls and ceiling and then I installed ½" plywood over those areas (I used OSB but wish I had used plywood as it will hold up better in the moist environment). I then constructed the East End as one large door with a walk door built inside of the main door. I only open the big door when I am loading/unloading the kiln. Two vents were then cut into the bottom of the south wall about two feet from each end. I put a screened soffit vent cover from the local building supply on the outside and a sliding ¼" plywood cover on the inside to regulate the amount of cooler moist air vented to the outside. (Illus. 11)


Illus. 11
Illus. 12
The entire inside - walls, ceiling and floor were then painted with the aluminum asphalt roofing paint to protect the construction from moisture damage. I then placed 2"x3"x4' boards on edge on 16" centers to stack the wood on (see Illus. 12). Once I had loaded the kiln with about 2,000bf of wood I attached a curtain of 6 mil plastic to the ceiling next to the fans running the full length of the kiln from the ceiling to the top of the wood stack and to the floor at each end. The curtain serves to force all of the hot air driven down from the collector to have to go through the wood stack. The curtain is long enough to reach the floor. I leave it bunched up on top of the stack and it is slit from top to bottom in the center. That way if I want to dry a half of a load on one end I can let that end go the floor. I use duct tape to tape any seams that need taping.Solar KilnbyBill Stuewe I reviewed close to 50 solar kiln plans on the Internet and settled upon this modification of my own. Its basic dimensions are: 20' long x 8' wide x 7' high from the floor on the south side and 11' 8" high from the floor on the north side. Orientation is facing due south and the roof slope is 30 degrees (which is my latitude). Originally, I had planned to pour a slab but found out that the concrete acts as a heat sink which is not good for drying wood. Concrete can be insulated but the fumes from drying oak can degrade the cement. Then, I was going to pour 5 concrete beams. The beams would have worked just fine, but I came across a free 30 foot piece of railroad track and cut it into five 6' sections to use as beams. I used dry sack-crete under each end to level them. I inset the first and last 1' from each end and set the rest up on 4' 6" centers. When I had all the beams perfectly level I poked holes in the sacks, watered them well, and let them set up. I then put four evenly spaced 4" x 6" x 20' runners down (see Illus. 1) and then put a deck of 3/8" exterior plywood on top of them. Next I put 2" x 4" x 8' floor joists down and put R-13 batt insulation between them. (I found out later that it would have been better to have used a rigid foam type insulation instead of batts. Batts are not good to use because of the high moisture problem associated with drying wood). Once the insulation was down, I put a layer of ¾" plywood decking (see Illus. 2) and painted it with aluminum asphalt roofing paint. Illus.1 Illsu.2I then framed the building on 16" centers leaving the square part of the East End unframed so I could make it into a door. I covered the outside with corrugated sheet metal that I had on hand. Illus. 3 Illus. 4Before I put the rafters on, I covered the entire attic floor with flat black 4'x10' flat sheet metal. I set a few rafters in place to get the correct distance for sheet metal coverage on the south edge, placing the tin against the "v" formed by the intersection of the rafter and ceiling joist (Illus. 6). Be sure and cover the ends and north walls with the metal also. The entire attic area must be flat black (Illus. 5). I put the rafters on 24" centers and made them 10 feet long. I ordered five 4'x10' double wall polycarbonate panels for the roof (the roof needs to be double however you do it so as to prevent as much heat loss as possible-Illus. 4). Illus. 5 Illus. 6 I capped the ends of the rafters top and bottom with 1"x6" cypress (cedar will do). The top soffit hinges so that I can open it when the kiln is not in use and close it when the kiln is in use. (Illus. 7 & 8) Illus. 7 Illus. 8 The bottom soffit is doubled and two 5" holes were installed with a fly cutter between each rafter. Attach screen wire on the top of the holes of the top board to keep bugs out, The bottom board is fixed in place so that it will slide and regulate the intake of fresh air. (see Illus. 9 & 10) Illus. 9 Illus. 10I installed short 2"x4" spacers between the ceiling joists under the edge of the attic sheet metal on the south side of the ceiling. I then ran the electrical wiring for the fans and lights. I put 2 attic fans from the local home center about 5' from each end and right next to the north wall. They fit nicely between the 16" ceiling joist spacing and blow the hot air from the attic collector down into the wood chamber along the north wall. (See fans in Illus. 13 & 15)I then installed the insulation in the north, south, and west wall and the ceiling. Next, I put in a vapor barrier of 6 mil plastic sheeting on the walls and ceiling and then I installed ½" plywood over those areas (I used OSB but wish I had used plywood as it will hold up better in the moist environment). I then constructed the East End as one large door with a walk door built inside of the main door. I only open the big door when I am loading/unloading the kiln. Two vents were then cut into the bottom of the south wall about two feet from each end. I put a screened soffit vent cover from the local building supply on the outside and a sliding ¼" plywood cover on the inside to regulate the amount of cooler moist air vented to the outside. (Illus. 11) Illus. 11 Illus. 12The entire inside - walls, ceiling and floor were then painted with the aluminum asphalt roofing paint to protect the construction from moisture damage. I then placed 2"x3"x4' boards on edge on 16" centers to stack the wood on (see Illus. 12). Once I had loaded the kiln with about 2,000bf of wood I attached a curtain of 6 mil plastic to the ceiling next to the fans running the full length of the kiln from the ceiling to the top of the wood stack and to the floor at each end. The curtain serves to force all of the hot air driven down from the collector to have to go through the wood stack. The curtain is long enough to reach the floor. I leave it bunched up on top of the stack and it is slit from top to bottom in the center. That way if I want to dry a half of a load on one end I can let that end go the floor. I use duct tape to tape any seams that need taping. Illus. 13 Illus. 14 Illus. 15 Illus. 16I have a box mounted on the outside with switches that control the fans and an electronic controller that a friend gave me. It monitors the temperature in the attic by means of a thermocouple and turns the fans on at a preset temperature. I adjust it periodically so that the fans come on when the temperature in the collector is about 30 degrees F hotter than the morning low temperature for that time of year. Attic fans come with a thermostat that will do about the same thing, but you must crawl up in the collector to adjust them. Observations:-- Normal kiln design is for 100 sq-ft of glazing area per 1,000bf of wood to be dried. (This kiln will handle 2,000bf with its 200 sq-ft roof) This design could be easily modified to 8' wide x12' long and would accommodate 8' long boards instead of 16'. This would be fine for most situations.--- Temperatures will soar to over 200 degrees F rapidly in the summer time if the collector is closed and the fans are left off.-- I have reached 148 degrees F inside the fully loaded kiln in August and at the same time the operating temperature in the collector with the fans on was 175 degrees F.-- I have dried 8/4 loblolly pine in August from well over 22 % MC to 7%n MC in 2 weeks. (500+bf were stacked on one end and all the air from the collector was forced through that stack-see Illus. 14)-- Much information on kiln design and operation was gleaned from the "Sawing And Drying Forum" at: woodweb.com-- I may be contacted at: billstuewe@yahoo.comOr at my website: http://www.billstuewe.com/


Illus. 13
Illus. 14

Illus. 15

Illus. 16
I have a box mounted on the outside with switches that control the fans and an electronic controller that a friend gave me. It monitors the temperature in the attic by means of a thermocouple and turns the fans on at a preset temperature. I adjust it periodically so that the fans come on when the temperature in the collector is about 30 degrees F hotter than the morning low temperature for that time of year. Attic fans come with a thermostat that will do about the same thing, but you must crawl up in the collector to adjust them. Observations: -- Normal kiln design is for 100 sq-ft of glazing area per 1,000bf of wood to be dried. (This kiln will handle 2,000bf with its 200 sq-ft roof) This design could be easily modified to 8' wide x12' long and would accommodate 8' long boards instead of 16'. This would be fine for most situations. --- Temperatures will soar to over 200 degrees F rapidly in the summer time if the collector is closed and the fans are left off. -- I have reached 148 degrees F inside the fully loaded kiln in August and at the same time the operating temperature in the collector with the fans on was 175 degrees F. -- I have dried 8/4 loblolly pine in August from well over 22 % MC to 7%n MC in 2 weeks. (500+bf were stacked on one end and all the air from the collector was forced through that stack-see Illus. 14) -- Much information on kiln design and operation was gleaned from the "Sawing And Drying Forum" at: woodweb.com -- I may be contacted at: billstuewe@yahoo.com Or at my website: http://www.billstuewe.com/