Modifications to my Lucas Dedicated Slabber DSM 23-19
- Nov 6, 2020
- 2 min read
Updated: Nov 10, 2025
In December of 2018 I purchased a Lucas Dedicated Slabber, DSM 23-19 From Baileys ( https://www.baileysonline.com/lucas-mill-dedicated-slabber-sawmill-76-maximum-cut-dsm-23-19.html ). It will slice up a log up to 76" across and 20' long. At the end of the Woodworking/Sawmill tab I have a short video of it in in operation. I have made some modifications to it and will show some pictures of them as well as a short video explaining them below. As you are aware woodworking and especially sawmilling can be dangerous. Any of my modifications that your decide to incorporate into your own practice you do so at your own risk and liability, as always be careful and do not attempt something that could result in injury to yourself or others.
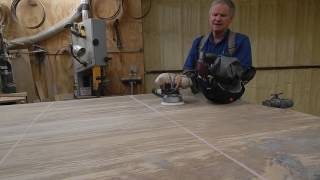
The mill in action--before adding the winch


This is my sawdust deflector--It keeps the sawdust from being thrown about 15' and drops it in a neat row under the rail--much easer to clean up


J-hooks and the 1/16" plastic between wood that is cut at the correct angle so that the deflector hangs straight down. ( If you are adding this to the swing mill used with the slabbing attachment I am sure it will be completely different)

This is another dust shield that helps keep sawdust off the motor

And I needed a way to hold it so I made a tray to hold wedges and other handy stuff. It is not attached to the mill. It just drops down between the motor and the horizontal cross member and sits there


This is the crank system/winch. My first sawmill was a Logosol and it used a crank system to pull the saw through the log so I just adapted it to this mill. The string is paracord

I have made a winch using two large washers and a piece of short pipe, then welded an extension to one of the washers for the crank.

Approximate measurements

The string is routed down to the left through a pulley at the the same level as the bar. I wanted all the pulling pressure to be in line with the bar to avoid any unwanted torque

Then the string is routed through a 1/2" PVC pipe velcroed over the top of the bar--to keep the string from being chewed up by the chain

Then the string is routed to the far end of the mill through two pulleys, again mounted in line with the bar

The pulley on the left is in line with the part of the motor trolley frame that I tied the string off to

I made a wooden block to slide into the end of the top tube of the rail. I made it 2X long and cut in half for each ot the two sides, mounted drop down 2x4s with a board attached at the same height as the bar to mount the pulleys on--held in place with a pin


Comments